"Active Flying"
At some point in your training, you will first encounter the magic words "active flying", or "active piloting". Sometimes the expression will seem ominous and sometimes downright mysterious, and you will hear all kinds of explanations of what it’s supposed to mean, such as "always feeling a tension on your brake lines".
Confused? Well, look no further – this is where we help you understand the basics of active flying. Unfortunately, many glider pilots – even those with ample experience – seem to have little or no idea of the relatively simple principle involved. However, since it's crucial for every pilot's safety, we felt we should offer the opportunity to learn more – not only to the fledglings of our paragliding school, but to everybody.
It's always better if you can support your practical experience with theoretical knowledge, so that’s where we’ll begin.
It's probably been a while since you had the aerodynamics of a glider explained to you. But a short explanation is all we need to take you straight to the heart of what active flying is.
First, you need to understand the significance of the two intersecting straight lines in our model, one representing the "chord", the other representing the "inflow direction". They intersect within the wing, resulting in what is known as the "angle of attack".
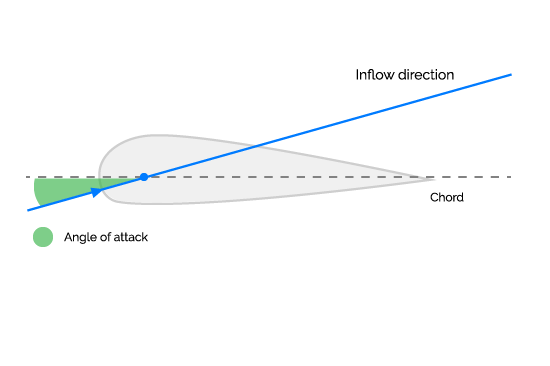
At this point it is important to understand that manipulating the brake line alters the chord, as simulated by our interactive diagram. So, you can actively alter the chord by pulling or releasing the brake. A stronger pull on the brake will lead to a corresponding change in the chord, thus increasing the angle of attack, while releasing the brake will reduce the angle of attack. Pushing the speedbar alters the chord to reduce the angle of attack, whereas releasing the bar results in an increase in the angle. To keep things simple, we have chosen not to include the effect of the speedbar in our simulation.
Now, pull on the brake in the diagram to see what happens to the aerodynamics of the wing. You will see turbulent air flow forming along the upper wing surface, beginning at the trailing edge. The more you pull on the brake, the further the stall point will move forwards. But don't worry: on any normal paraglider profile (high profile thickness), that turbulence needs to come a lot further towards the leading edge before the whole glider will stall. More slender profiles (e.g. on high-performance and acro wings) have less tolerance and therefore a smaller range for the flyable angle of attack.
Of course, there will also be turbulence along the lower wing surface. Again, for simplicity's sake, we've left this out of the simulation.